Preparation - Diademaproetus cf. praecursor
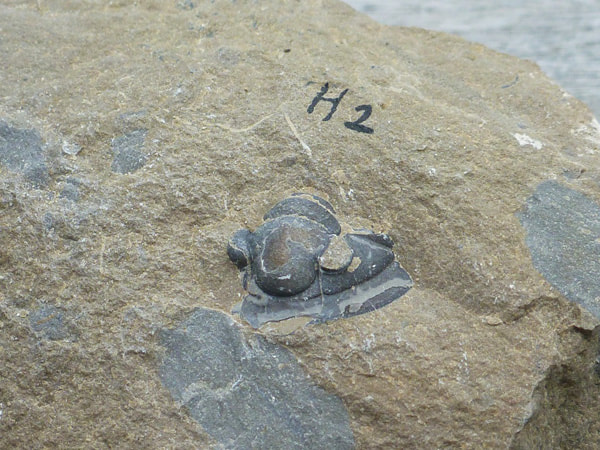
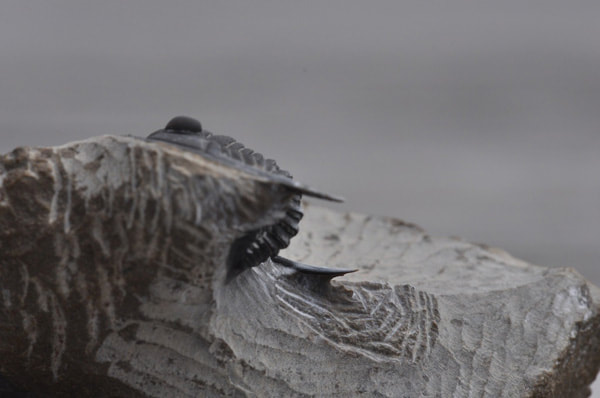
This report covers the preparation of a small Diademaproetus from the Tafilalt basin. Notice the grey patches in the brownish-red matrix. These patches are notably harder and non-fossiliferous. It is likely we deal with a clastic deposit here. The left side of the cephalon has been exposed, and parts of the left eye and anterior cephalic rim are left in the counterpart.
When fitting the part and counterpart, we can see there is some irreversible damage to the anterior cephalic margin and the distinct protuding 'tongue'-shaped preglabellar field, which is a pity because these are important features for this genus. The presence of the first thoracic segment, of which the upper part is just visible in the original piece, combined with the fact that both librigena are there and fit the cranidium tightly, are good indications that the trilobite is complete. The first image shows the piece before the preparation.
When fitting the part and counterpart, we can see there is some irreversible damage to the anterior cephalic margin and the distinct protuding 'tongue'-shaped preglabellar field, which is a pity because these are important features for this genus. The presence of the first thoracic segment, of which the upper part is just visible in the original piece, combined with the fact that both librigena are there and fit the cranidium tightly, are good indications that the trilobite is complete. The first image shows the piece before the preparation.
|
|
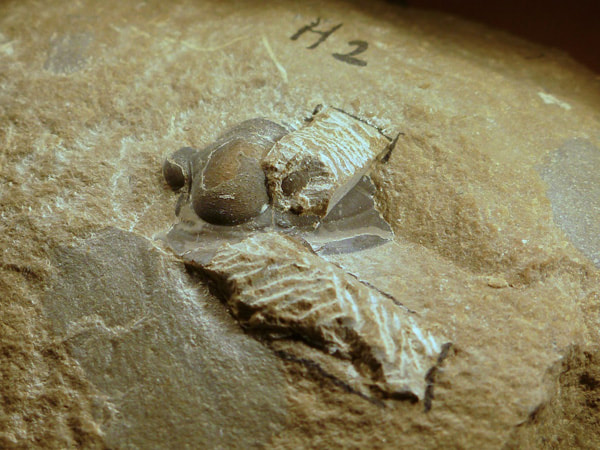
The first step is to refit the missing parts, i.e. the eye and parts of the preglabellar field (see second image). A thin layer of shell is missing from the upper part of the glabella, but investigating the counterpart it becomes clear that most of it is missing. Hence, no attempt is made to re-attach the remains of this shell.
To cut out the missing parts from the negative, a diamond blade was used. The contours of the pieces are drawn on the matrix as a reference to ensure a quick and correct fit when gluing them on. Because we'll need to work with the airtool on these small pieces, the adhesive bond must be very strong, so we apply a polyester resin. An additional advantage here of using a resin, is that is fills the small gaps from the missing pieces of the preglabellar field.
To cut out the missing parts from the negative, a diamond blade was used. The contours of the pieces are drawn on the matrix as a reference to ensure a quick and correct fit when gluing them on. Because we'll need to work with the airtool on these small pieces, the adhesive bond must be very strong, so we apply a polyester resin. An additional advantage here of using a resin, is that is fills the small gaps from the missing pieces of the preglabellar field.

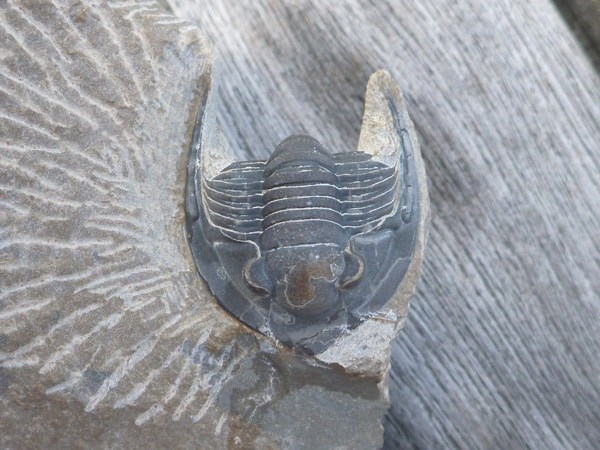
The preservation of the trilobite is excellent; note the combination of terrace lines and tubercles on the anterior part of the glabella. A thin transparant mineral layer covering the shell forms whitish marks when it's damaged (see cephalic margin in the previous picture). As such, every accidental hit with the airtool, no matter how small, leaves a nasty mark. There is little room for error. Because it is unclear at this time whether or not this layer forms part of the actual shell, I decide to leave it untouched as much as possible, despite the fact that removing this layer would be not too difficult and would aesthetically improve the specimen.
The pictures below show the next stages in the preparation process. The contours of the trilobite are exposed. It is in a partially enrolled pose, and the pygidium is tucked away under the cephalothorax. This means a lot of material needed to be removed. The thorax segments end in a needle-shaped point at both sides. Due to the curve of the enrolled thorax, every next segment lies below the fragile point of the previous segment. It is also in this stage, that I decide to prepare the genal spines free-standing. The partial enrollment allows for sufficient matrix to remain as a sturdy base for the trilobite to rest on.
During preparation, a piece of matrix comes off bearing about 1/3rd of the left genal spine. It is immediately blown away by the airflow over the airtool tip. My first efforts to find the piece are futile, so I apply the "clean & sieve" routine: the whole surface of the working table is cleaned and the debris is sieved in a couple of different-sized fractions. Then I select the fraction that I think corresponds most with the missing piece in terms of size and shape. After a mere 5 minutes, I retrieve the spine, which can be re-attached. Because the chances are real that more parts of the spines come off during the next phases of the preparation, I decide to apply a thick strip of reversible glue to the upper part of the spines. The idea is that this glue prevents the pieces from being carried away by the airflow in the likely event of them breaking. The cracks in the glabellar field are largely filled by epoxy. The remaining cavities are filled using an ultra-thin instant glue.
|
|
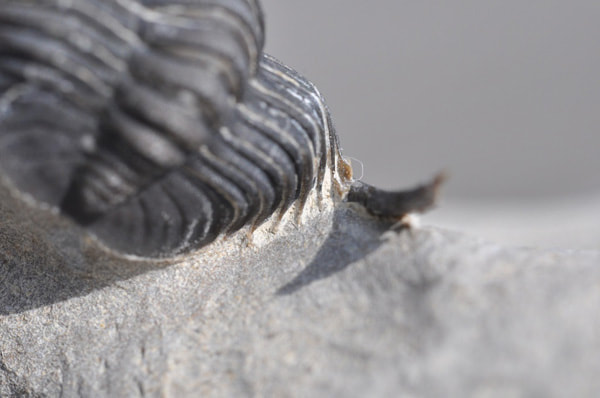
The next phase of the preparation is nerve-wrecking: using a powered-down fine airtool, two of the three faces of each librigenal spine are uncovered, along with most of the lateral pleurae. The working space here is very tight. Next, much of the remaining matrix is removed from the undersides of the genal spines. The left spine breaks again, but the glue on top holds the pieces together. Using the ultra-thin instant glue has advantages here, as it infiltrates the crack through capillary force. As such, there is not need to separate the part before re-attaching it.
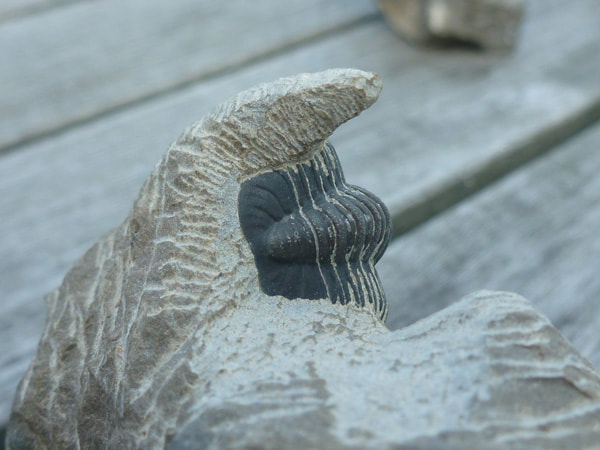
When almost half of the genal spines are standing free, it seems clear that it's better to switch to air abrasion to do remove the rest. I put this off to this point, because air abrasion may damage the specimen fast, and I have no other piece from this locality to test the technique and find the right abrasive powder and pressure settings. After some test runs on the matrix, I slowly work my way at low pressure from the tip to the base of the spine. The tip of the abrader is pointed away from the fossil as much as possible, in order to avoid unnecessary loss of detail. Frequent visual controls for quality loss reveal that there is almost none. The underside of the genal spine show pronounced terrace lines, a fascinating detail.
When almost half of the genal spines are standing free, it seems clear that it's better to switch to air abrasion to do remove the rest. I put this off to this point, because air abrasion may damage the specimen fast, and I have no other piece from this locality to test the technique and find the right abrasive powder and pressure settings. After some test runs on the matrix, I slowly work my way at low pressure from the tip to the base of the spine. The tip of the abrader is pointed away from the fossil as much as possible, in order to avoid unnecessary loss of detail. Frequent visual controls for quality loss reveal that there is almost none. The underside of the genal spine show pronounced terrace lines, a fascinating detail.
|
|
Now that the underside of the genal spines is largely freed, there is more room to tackle the pleural spiny tips. Again we switch to the fine airtool. As pointed out earlier, the pleurae need to be finished one at a time, in order to avoid damage. Before commencing the finishing of the genal spines (the glue layer still needs to be removed, along with some minor pieces of matrix), I do the finishing of the rock. The left genal spine breaks off while I'm not working on the specimen. It's a clean crack so not all is lost. The spine tip is nicely tucked away in a micromount box to be re-attached at the end.
Then, the precarious job of removing the 'safety glue' covering the spines. This is mostly done using acetone, but also with an extremely sharp needle. All goes well until the right spine cracks, somewhere halfway, due to a sudden movement of my part. During the manipulation to get the spine tip into a micromount box, it breaks in half. A clear sign of fatigue, I should have called it a day half an hour earlier.
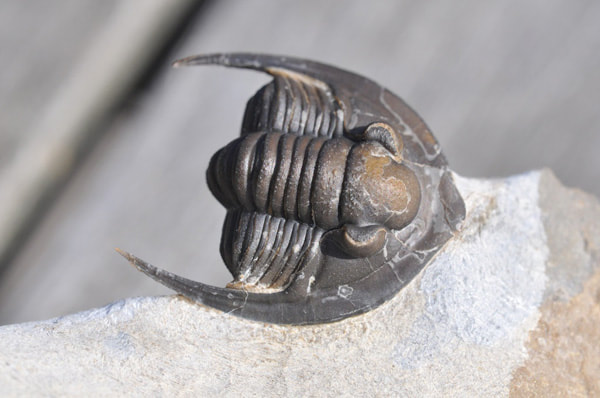
The next day, the work is resumed with a calm hand. Preparing the pieces before gluing takes most of the time. I use a thick instant glue, and the pieces are manipulated using adapted toothpicks under binoculars. It goes smooth and once the pieces are in place, the glue hardens quickly. This is the end of this prep project. The end result is not only pleasant to the eye, but also yields a detailed sight on the underside ot the cephalic margin and spines, parts playing a significant role in locomotion and behaviour of this trilobite.
Then, the precarious job of removing the 'safety glue' covering the spines. This is mostly done using acetone, but also with an extremely sharp needle. All goes well until the right spine cracks, somewhere halfway, due to a sudden movement of my part. During the manipulation to get the spine tip into a micromount box, it breaks in half. A clear sign of fatigue, I should have called it a day half an hour earlier.
The next day, the work is resumed with a calm hand. Preparing the pieces before gluing takes most of the time. I use a thick instant glue, and the pieces are manipulated using adapted toothpicks under binoculars. It goes smooth and once the pieces are in place, the glue hardens quickly. This is the end of this prep project. The end result is not only pleasant to the eye, but also yields a detailed sight on the underside ot the cephalic margin and spines, parts playing a significant role in locomotion and behaviour of this trilobite.
|
|